1What it does
The plugin is two independent features sharing one settings screen. Most sites use only the first, and nothing about the second is required — leaving its fields blank simply means the editor panel never appears.
The chat bubble
Your agent answers visitors on the front end of your site, in a floating widget. Needs one value: your agent's widget key.
Every planThe editor assistant
A panel in the post editor that drafts, outlines, summarises or rewrites with your agent. Needs a Qunivex API key.
Starter and Pro2Requirements
- WordPress 6.0 or newer.
- PHP 7.4 or newer.
- A Qunivex account with at least one project. The chat bubble works on every plan, including the Free Trial.
- For the editor assistant only: a plan that includes API access — Starter or Pro.
The plugin is licensed GPLv2 or later. It works on single-site and multisite installs; on multisite the settings are per site, since each site normally wants its own agent.
3Installing
The plugin is submitted to the WordPress.org directory and awaiting review. Until that clears, you install it by uploading the zip — a normal, fully supported WordPress install path, and the same file that will be published to the directory.
- In WordPress, go to Plugins → Add New → Upload Plugin.
- Choose
qunivex-wordpress-0.1.0.zipand click Install Now. - Click Activate.
If you have a plugin in a .zip format, you may install or update it by uploading it here.
install_plugins capability — in practice, an administrator.
Activating changes nothing visible on your site yet. The plugin deliberately prints no markup until a widget key is saved, so an activated-but-unconfigured install is inert rather than broken.
qunivex folder — the same folder the directory will use — WordPress starts offering one-click updates the moment the listing appears, with nothing to reinstall and no duplicate copy left behind.
4The settings screen
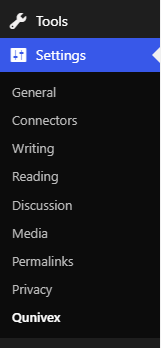
Activation adds one screen, at Settings → Qunivex. It is the only page the plugin adds and the only place it stores anything.
The entry appears only once the plugin is activated — uploading alone does not add it. Viewing or saving the screen requires the manage_options capability.
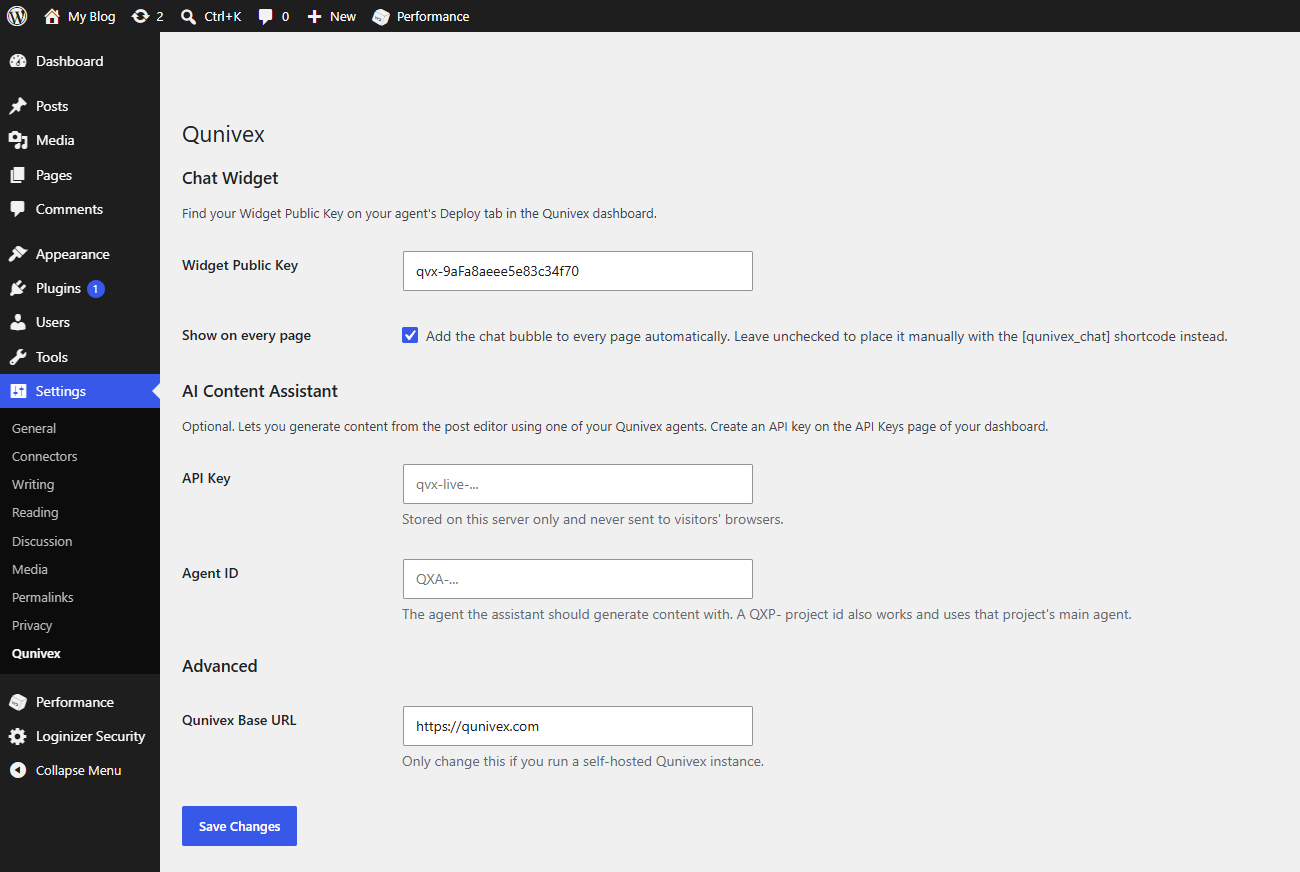
Every field
- Widget Public KeyRequired for the bubble
- Your agent's public widget key, starting
qvx-. Find it on your project's Overview or Deployments page in the Qunivex dashboard. Public by design: it identifies the agent, is restricted by domain, and carries no account access. - Show on every pageCheckbox
- Ticked, the bubble is added to every front-end page automatically. Unticked, it appears only where you place the
[qunivex_chat]shortcode. - API KeyAssistant only
- A Qunivex API key, starting
qvx-live-. Create one on the API Keys page of your dashboard. Unlike the widget key this is a real credential; it is stored in your WordPress database and used only in server-side requests. - Agent IDAssistant only
- Which agent writes for you, as
QXA-…. A project id (QXP-…) also works and uses that project's main agent. - Qunivex Base URLAdvanced
- Defaults to
https://qunivex.com. Change it only if you run a self-hosted Qunivex instance — pointing it anywhere else stops both halves of the plugin from working.
5The chat bubble
Paste your widget key into Widget Public Key, tick Show on every page, and save. That is the entire setup.

What gets added to your pages
On a page where the bubble is enabled, the plugin prints one script tag in the footer, immediately before </body>:
<script src="https://qunivex.com/widget.js" data-agent="qvx-…"></script>That is the same embed any non-WordPress site pastes by hand. The plugin exists because a WordPress user has nowhere convenient to paste it, not because the widget behaves differently here. No stylesheet, no jQuery dependency and no additional requests are added to pages where the bubble is switched off.
6Allowed domains
The widget only answers on domains you have explicitly allowed on your project's Deployments page, so copying your key onto another site does nothing. If your WordPress domain is not on that list, the script tag loads and the bubble never appears.
Two rules are worth knowing, because they explain almost every "I added it and it is still blocked":
- Enter the bare hostname —
example.com, nothttps://example.com/and notexample.com:443. A hostname automatically covers the apex, every subdomain and any port, soexample.comalso allowswww.example.com. - For a local install, add the IP with its port, like
127.0.0.1:8000. An IP entry that names a port matches only that port, and an IP is never treated as having subdomains.
A blocked domain shows up as a 403 on /api/public/agents/…/config in your browser's console.
7Shortcode
To put the bubble on specific pages only, leave Show on every page unticked and add the shortcode to those posts or pages:
[qunivex_chat]The shortcode renders nothing where it sits — it asks for the widget, and the script tag is still printed in the footer. So it works anywhere in the content, and putting it in a post twice still loads the widget once.
In the block editor, add a Shortcode block; in the classic editor, type it into the content. It also works in a widget area or a template through do_shortcode().
8Editor assistant
Optional, and off until configured. Fill in both API Key and Agent ID, and a Qunivex AI Assistant panel appears in the sidebar of the post editor — on posts, pages, and any custom post type that supports the editor.
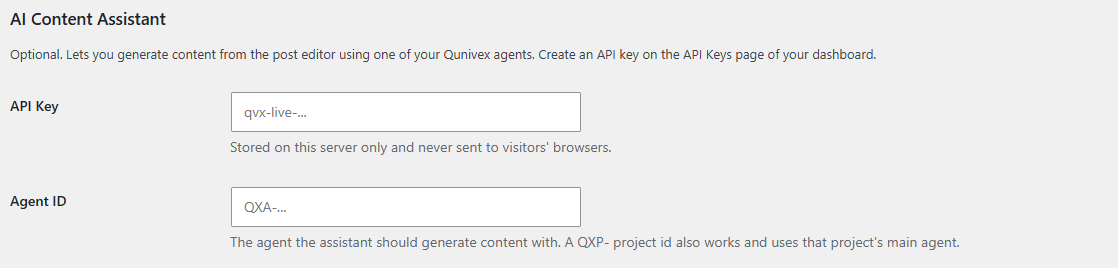
Type what you want written, optionally tick Include the current post content to give the agent what you have so far, and press Generate. The reply arrives in the panel with Copy and Insert into post beside it — nothing is written into your post unless you ask for it.
Which agent writes
The agent named in Agent ID answers with everything it is configured with in Qunivex — its model, system prompt, knowledge base, tools and guardrails. An agent grounded in your product documentation writes about your product; a general one writes generically. It does not have to be the same agent as your chat bubble, and on many sites it should not be: the bubble answers customers, the assistant writes in your house voice.
How requests are billed
Each generation is one call against your plan's monthly API allowance
(Starter: 5,000 calls, Pro: 25,000 calls). That allowance is separate from your public chat quota, so writing posts never eats into the conversations your bubble can have. Requests go to https://qunivex.com/v1 from your WordPress server — see the API reference if you want to call the same endpoint yourself.
qvx-…) belongs in the Chat Widget section; the API Key (qvx-live-…) belongs in the AI Content Assistant section. Pasting the widget key into the API field is the most common cause of a rejected key.
9Appearance
Colours, the launcher icon, the avatar, the welcome message, starter questions and the pre-chat form are all configured in Qunivex on your project's Appearance page — not in WordPress. The plugin has no styling options of its own, on purpose: the widget renders inside your page but is styled entirely by the agent's own configuration, so a theme change cannot break it and it looks the same wherever that agent is embedded.
Appearance changes are fetched live and take effect on the next page load. They do not require a WordPress cache purge, unlike turning the widget on or off, which changes the printed HTML.
10Data & privacy
What the plugin stores and sends, stated plainly:
- It creates one option row in your WordPress database,
qunivex_options, holding the five settings above. It creates no tables, no posts and no user meta. - It stores no visitor data in WordPress. Conversations happen between the visitor's browser and Qunivex; nothing about them is written to your database.
- Your API key never reaches a browser. Assistant requests are made from your WordPress server; the key is not printed into any page or exposed to the editor's JavaScript.
- The front end contacts Qunivex when the bubble is enabled, to load the widget script and the agent's display configuration. Sites in jurisdictions requiring consent for third-party services should treat this like any other embedded service.
- Deleting the plugin removes its option row, on every site of a multisite network. Deactivating leaves it in place, so your settings survive a temporary deactivation.
See the Qunivex privacy policy for what happens to conversations on our side.
11Troubleshooting
Almost every report is one of these. The first one splits the problem in half before you change anything.
The chat bubble is not showing up
First, find out which side the fault is on. View the page source on your site and search for data-agent. You are looking for a script tag just before </body>.
The tag is missing → the fault is in WordPress. Check that the plugin is activated (uploading alone does not activate it), that a widget key is saved under Settings → Qunivex, and that either Show on every page is ticked or the shortcode is on that page. With no key saved the plugin prints nothing by design.
The tag is there but no bubble → the fault is in Qunivex. On your project's Deployments page, confirm the widget is switched on and your domain is allowed. Then open the browser console: a 403 on /api/public/agents/…/config is a domain that is not on the allowlist.
I added my domain and it is still blocked
Enter the bare hostname, without a scheme, a trailing slash or a port — see Allowed domains for the exact matching rules and the local-install exception.
I changed a setting and nothing happened
Purge your page cache. If you run WP Rocket, W3 Total Cache, LiteSpeed Cache or a CDN, a page cached before you enabled the widget still serves the old HTML — and the script tag lives in that HTML.
Appearance changes are the exception: they are fetched live and need no purge.
The editor assistant says the key was rejected
Check you have not swapped the two credentials — the API key starts qvx-live-, the widget key does not. Then check the key has not been scoped away from this project on the API Keys page: a key deliberately narrowed to other projects reports the agent as not found rather than as forbidden.
A rejection can also mean the monthly API allowance is spent, or that the account's plan no longer includes API access.
The assistant panel is not in my editor
Both the API key and the agent ID must be filled in — the panel is not registered at all while either is blank, so a half-configured install shows nothing rather than a broken panel. The panel also only appears on post types that support the editor, and only for users who can edit posts.
12Updates & removal
While the plugin is distributed as a zip it does not auto-update. To move to a newer version, download the current zip and upload it over the installed copy; WordPress will ask you to confirm the replacement and your settings are preserved. Once the directory listing is live, one-click updates begin working automatically because the zip already uses the qunivex folder name.
Deactivating stops the plugin and removes the bubble from your site, but keeps your settings. Deleting removes the plugin's single option row entirely, including the stored API key.
Questions, or something not covered here? Get in touch — or see the other integrations if you want your agent somewhere besides your website.